Dec 13, 2012

Simple Wood Nativity


I love nativities, but holy cow, they are expensive. I someday would love to have a collection of them, so when I saw all the different simple wood natvities on Pinterest I had to make one too. I loved how they were wood, because that just seemed so perfect. Christ was a carpenter, and of course a very simple and humble man, he wouldn't need anything extravagant. So I thought the simple nativity fit well. 
It was pretty easy to make, I made 7 of them so it took more time making that many. I am giving them out as gifts to some family members, like our moms and such. 

To make these you need: 
1- 6" 2x2 piece of wood for Joseph
1-5" 2X2 piece of wood for Mary
1-3"x2" piece of furring strip. For baby blanket
2- 1 1/2" ball knob For adult heads
1- 3/4" furniture button for baby head or 1/2" depending on how big your wood piece, see below.
1 popsicle craft stick
1 wood star
long piece of Jute
paint of desired colors
Wood glue

You can get the 2x2 pieces at a hardware store. I got mine at Lowe's. They come in really long pieces and so you just have them cut it if you can't yourself. They charge $.25 for each cut and about $1.50 for the whole long 2x2. I got lucky and this really nice old man who worked there cut the pieces for me for free. So I got enough wood for 7 nativities, and one extra long piece that was too short for the machine to cut all for $1.50.  I forgot to get the wood piece for Jesus' body. But I found these like wooden gift tags at Joann's for a dollar for 7, so I cut those so that they were just rectangles and not tags. But the tags were a little wider than the wood piece in the original picture, so I had to buy bigger wood balls for the head. the original picture calls for the smaller button. 


Sand your wood pieces. Paint everything your desired color. I then used gel stain and applied that. Then I glued everything together. I used the popsicle stick to attach the star to the back of Mary. I added the jute and my little tag and was done! I really like how it turned out, I hope everyone I made them for likes them too. 


HERE IS THE ORIGINAL You can find the tutorial for this one over at Learning to be Me.


Dec 12, 2012

Personalized Accordion Cards


{Card for my sister's birthday}

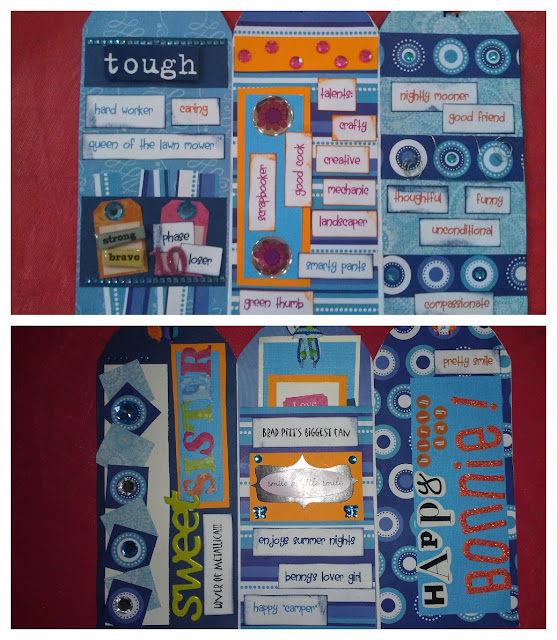
My mom is the master of card making. She whips them out like crazy and has a whole box full of cards she has made, and they are all so cute! But the cutest cards she makes are these cards that open up like an accordion and are super personalized and fun! They are seriously my most favorite cards ever! 
She adds stuff all over them that are fun inside jokes, or good qualities about you and the card totally is a reflection of the person. They do take more time than a regular card, so she only makes them occasionally, but they turn out well worth it, and are soooo much better than getting a generic card from the store, or even a homemade card that could be for anyone. 
So she made a couple recently and I begged her to send me some pictures of them and tell me how to do it. 
So here is how to make one of these great cards!

1. Get a 8X11 Piece of plain paper
2. Fold the paper 3 times equally accordion style. (so you alternate the folds), this means you will have three panels on each side, so 6 panels total. 
3. Cut the top of the paper to your desired height and round the tops on all 2 panels. 
4. Cut patterned or glittered, or colored paper out for each panel, its fun to do each panel different colors or patterns that all tie together. Glue the paper onto the plain white paper. 
5. Add embellishments all over, you can use stickers, ribbon, wire, rhinestones, more patterned paper, glitter, or paper punches. You can also add pictures, or baby pictures of the person if you have those. Add stuff that reflects the person's personality. It is good to add their name, maybe a cute personalized note, and then add words or sayings about that person. Like I said before, their good qualities and inside jokes are always fun. 
You can use sticker letters or print stuff out on your computer or use a combination like my mom does. My mom likes to use an ink pad to color the edges of the card-stock when she prints out the paper. 
Also my mom usually makes a book mark and adds it to the card, on one of the middle panels she makes a pocket out of the cardstock and then adds the bookmark there. I love the bookmarks. You can see the bookmark in the picture below with the Taylor Swift Sticker.

6. While glueing everything down and adding embelishments make sure the card is folding nicely. If you use a thick paper or glitter paper, don't add too much glue or it will make the card buckle. 
7. Use a hole punch to cut three holes in the top of the panels. Then add ribbon to it and tie it off. My mom usually uses 3 different kinds of ribbon or yarn or whatever to add texture and fun! 
This card is based off of Taylor Swift's RED album and Christmas. My mom's friend asked my mom to help her make. The card is a gift for my mom's friends daughter and will have Taylor Swift concert tickets in it. I guess the girl really loves Taylor Swift (who doesn't?)

{This card my mom made for my aunt, so her sister, for my aunt's birthday. The picture shows both sides} 

{This is both sides of the card she made for my sister's 15th birthday. And in case you are wondering what 'Feed me Faster' its an inside joke. My sister got surgery on her nose earlier this year and on pain medication made my mom spoon feed her ice cream and then told her to 'feed her faster' hahahaha, we will never let her live it down.}

 But the whole idea of the cards is to be personal and fun. These are cards people usually only get once or twice in a life time. I still have the one my mom gave me when I was in high school. But living in an apartment makes me keep it in storage, so I couldn't take a picture of it. But she had baby pictures of me on it and everything. I love that card!