Dec 27, 2010

What i have been working on!

 I hope everyone had a very merry Christmas. I had a blast. And I was totally spoiled by my husband and the rest of my family. 
I have been sooo busy lately. I have had my family in town visiting here from their home in New Mexico and I have been crafting away like a madman.
So here is a glimpse of what I have been working on.
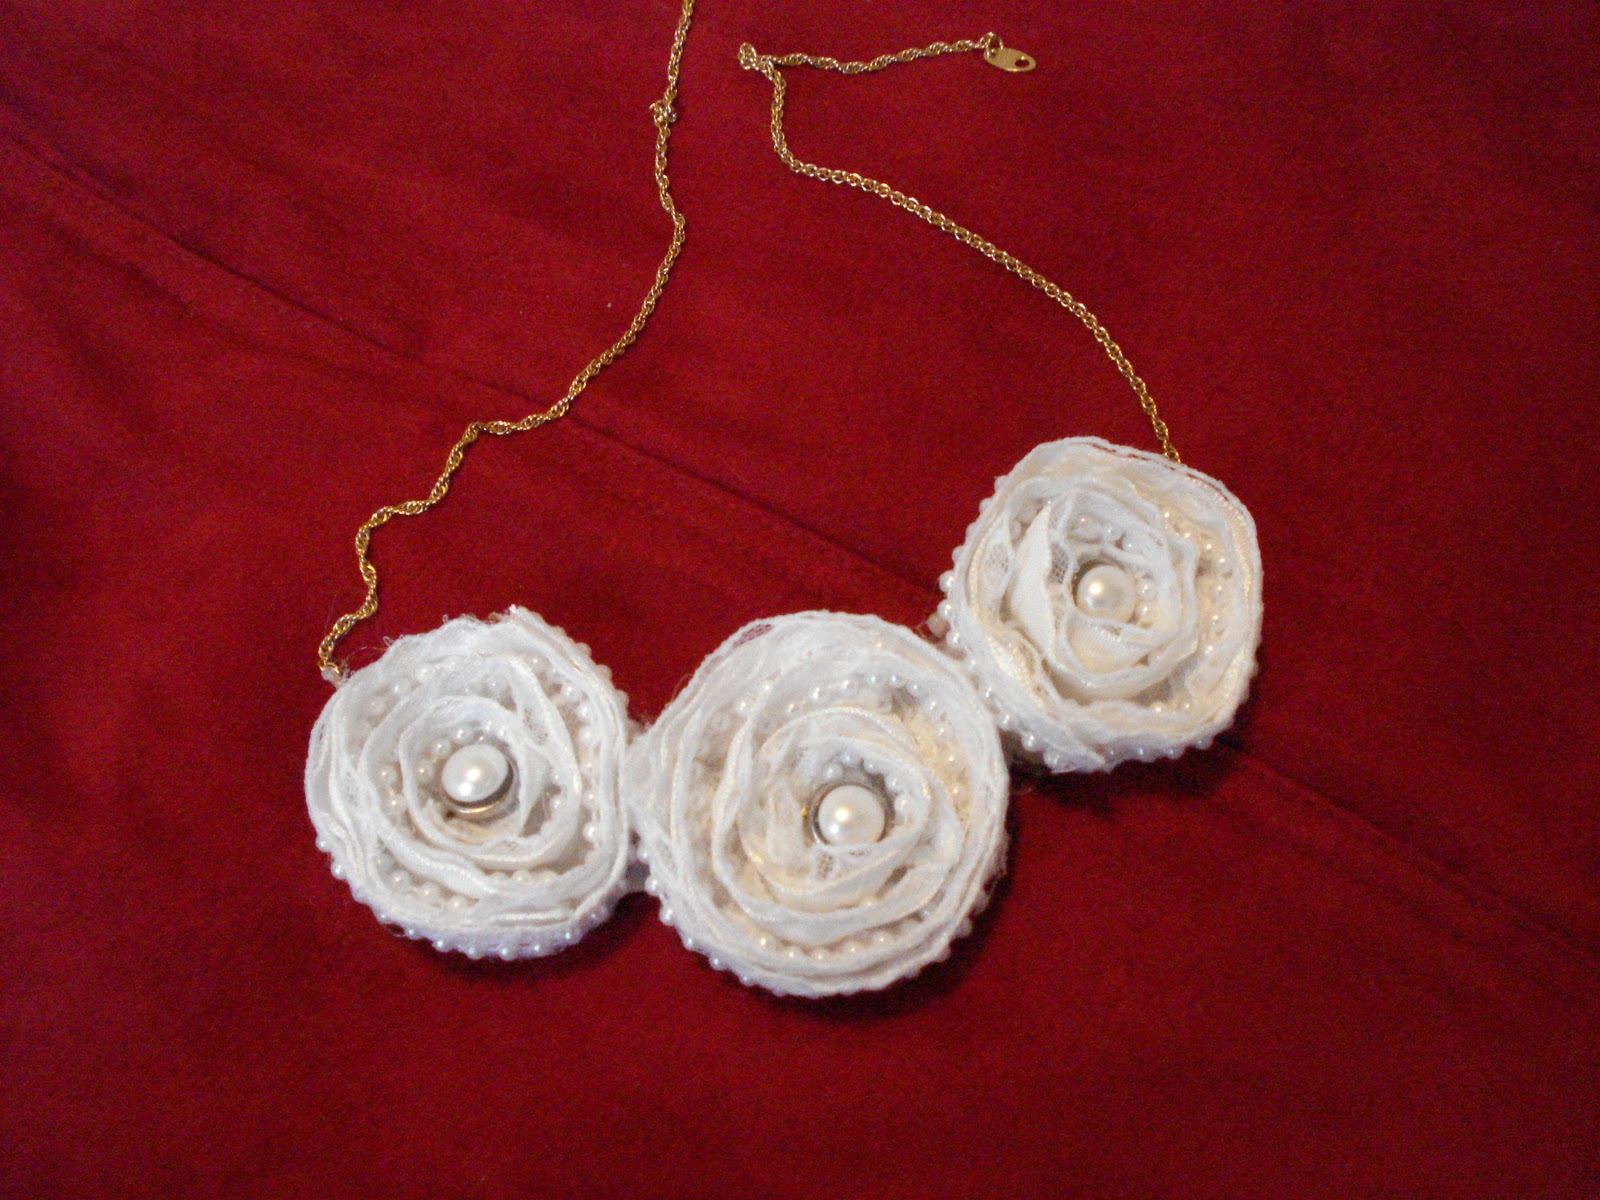
I made a bunch of these ribbon rosettes like the one in my giveaway last week. I made more for my sister too.


Here are all my fabric rosettes that I made over the last week. I made a few more, but these are just the ones I am selling on my etsy shop. Basically what I have been doing is putting a pin clasp behind most of them and then putting them on necklace chains. I am doing it like that because then you only need one chain and then you can change out the rosettes easily to match your outfit or mood. these are so much fun to make!

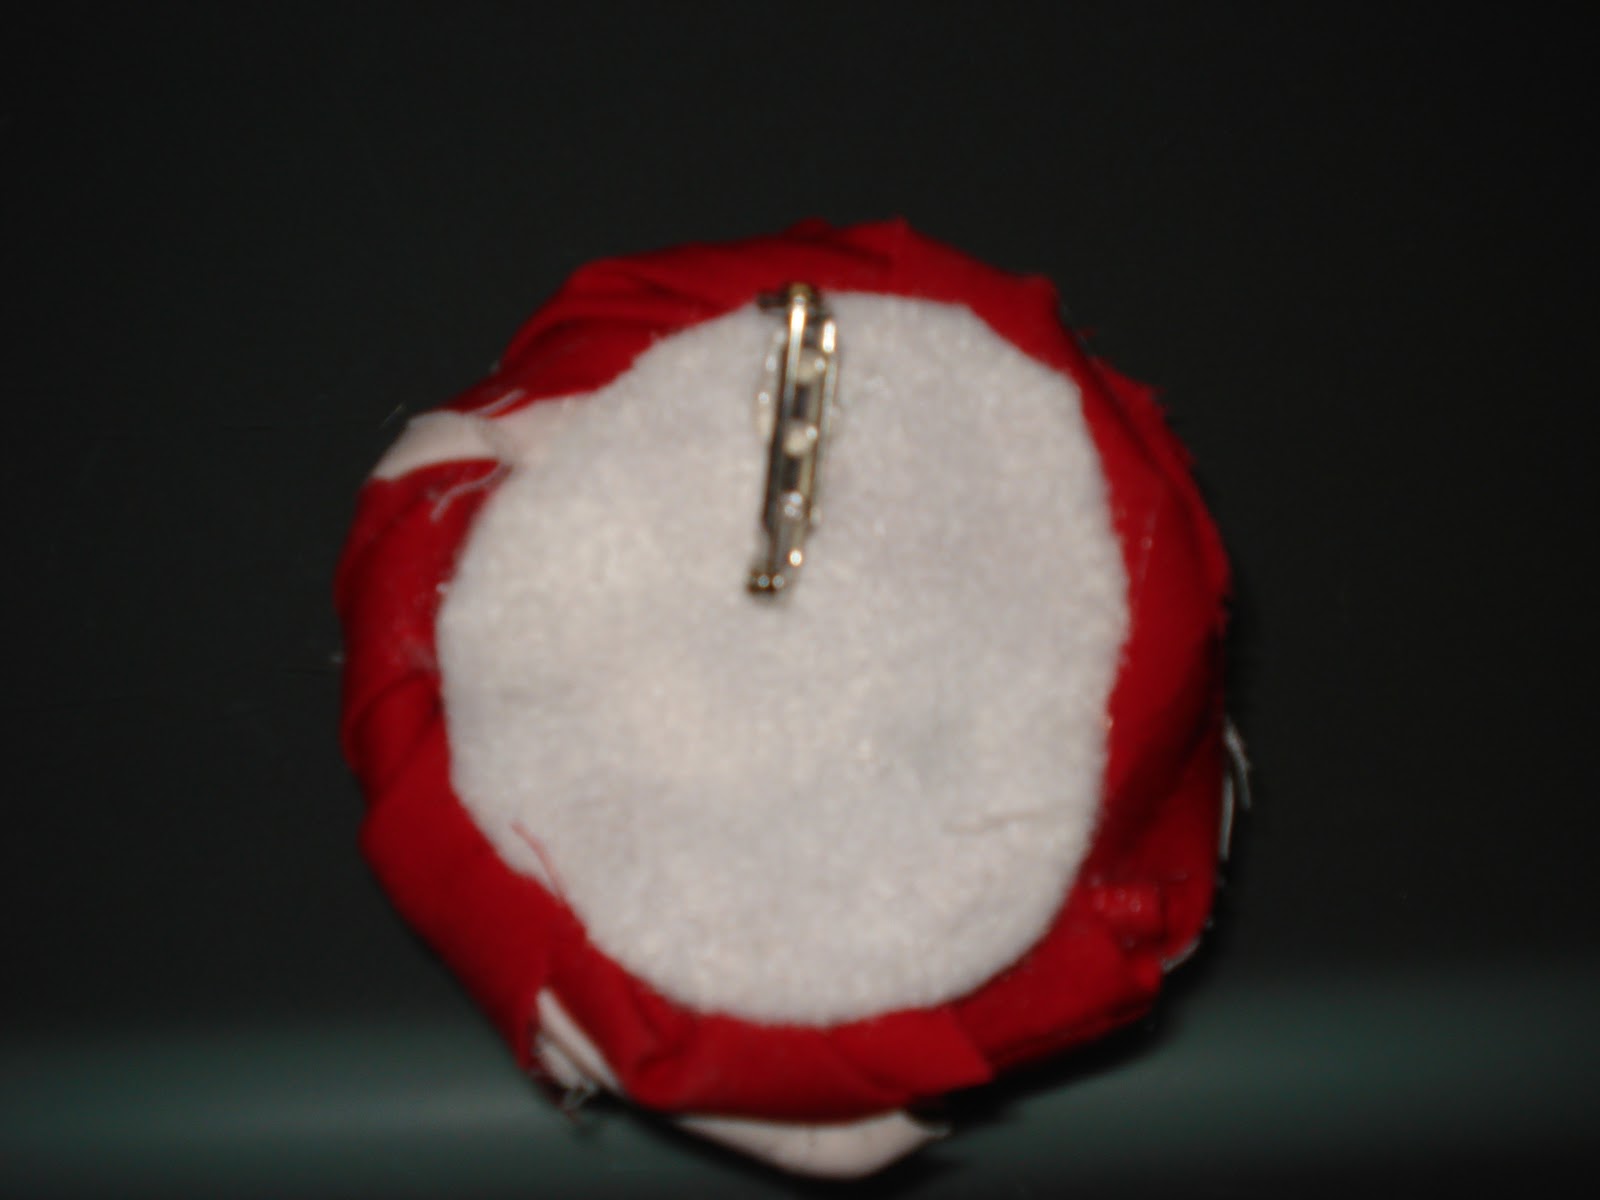
See! I thought it was a good idea, then you can buy one super cute chain and just wear it with different rosettes.  I have also made a few into headbands, I love the stretchy bungee type headbands, they are so cute! Also I gave my mom one that looks like the red and white rosette and she uses it as a brooch she just pinned it on her coat and now her coat is all jazzed up!

So I am starting an etsy shop so if you are interested in buying these they are going for $8.00 on Etsy for a headband or necklace, whichever you want. But If you a follower of my blog you can get them for $6.00. I would post a link for my etsy shop, but its still in the process of being set up. I am having technical difficulties getting the pics on there. Apparently I have to shrink the pictures. Which I don't know how to do. I need my husband's MAC. So the etsy shop will be up shortly. But if your interested in buying one contact me and you can ge the discount price! Nessapierson@gmail.com

But anyway look at what I was given! Magnet boards, aren't they so cute!! I am so excited to hang them up they are both so cute.


My friend Addison gave me this one


And my aunt Lori gave me this one!

They are so cute. I love them.

I looked at them a bit to see how they were made and all you get is a magnet board or some type of metal board (I know Addison got hers at the Wood Connection. A place where I have yet to go, but am dying to see!) And then you get some cute scrapbooking paper and then mod podge it on there. (Do you like how i used mod podge as a verb?) Then to make the magnets Addison used brads, cut off the pokey things and glued a magnet to them. Lori cut out metal squares or bought metal, not sure which put some cute vinyl on there and glued a magnet to the back. Top it off with some ribbon and you are good to go! I love them ladies, thanks so much!


Dec 22, 2010

I was featured!!

I am so excited, my recipe for the slow cooker pulled pork was featured on another blog.


Its my first time being featured on another blog for anything and I am so happy.
Dana was super nice and invited me to her cute blog's linky party that they had last week, and then she featured my bbq pork recipe. I have had my blog since August, but I just barely started branching out, I originally intended it to be a more family blog, but then I started crafting and posting recipes and found the whole fun world of blog land. So my little blog is growing and I am so excited.
But I really love Saturday Mornings blog, they are holding a giveaway for $50 American Express giveaway so you should go there... NOW.
 
I have recently had a few more followers too, and I just wanted to say Hello to all my new friends and I look forward to getting to know all of you more!
I also use exclamation points alot, so I am sorry about that, its a bad habit, haha.

Dec 20, 2010

What you should know about me!


So alot of cool blogs have been doing some fun random facts about themselves parties. And I wanted to join in on the fun too! So here are some fun facts about yours truly.

{Me and Jer being a Pac-Man game board for Halloween}
 
I can't stand most reality shows (sorry!) I only like the ones where they bake the cool cakes.

I ALWAYS ruin jokes.

I love the smell of gasoline. Whenever I fill up my car it is awesome.


Driving gives me anxiety.

I am not very good at matching colors.

I know how to oil paint (I took a class at night for two years)

Folding clothes is the devil... I would rather clean the toilet.

I Hate cheese.  But I do love myself some cheetos


Walmart is my favorite store in the world. But why does everyone there walk so SLOWLY??

Everytime I use my glue gun I get a blister. OUCH.

When I was a baby my mom would have to buy me goats milk since I wouldn't drink cows' milk. Now I won't drink either. I don't eat most milk products, except Ice cream. Ice cream RULES.

MEAT IS LOVELY
as is CHOCOLATE.
Especially DARK Chocolate

I LOVE Princess shows, Beauty and the Beast is my fav!

I hate to measure things. Cooking, art projects, hanging pictures, I will try to do it all without measuring.

Talking on the phone HURTs my ears.

I am one of the few people who has heard of, let alone loves, The Nanny.


I re-read the HARRY POTTER series every year.

I never ever ever want an animal with fur. No dogs, no cats, no hamsters. I hate the hair, I hate when they lick my face, and I hate when they jump on me. It grosses me out and makes me feel dirty. But weirdly enough, I want a turtle, a tiny turtle. They are adorable!! I could even settle for a lizard. I know I am weird, but hey they don't have hair. Yes, I can have a creature with scales and could possibly carry salomonella, as long as it doesn't have hair, I have issues.

Me with my sister's tiny turtle that I was able to watch for a month. I love this turtle.


So now its your turn. You can go to HERE to Little Miss Mama and link up your fun self story as well or HERE to the Idea room or HERE to Vintage Wannabe
I would also LOVE, LOVE, LOVE, if you put your story in my comments section too so I can read them!

Dec 17, 2010

Pearl Flowers


I am so excited, I made my first piece of jewelry that wasn't made out of boondoggle or like one of those beaded lizards, you know, one of these: 
Yeah I would wear them as jewelry sometimes, they were versatile... I used to sell the things in like fourth grade, but moving on. 
I saw this really cute tutorial on Tatertots and Jello, guest posted by Little Miss Mama, She made the cutest Anthropology inspired necklae. It was made out of lacey ribbon and it was just sooo cute. I fell in love. Plus her tutorial was so easy that I knew I could do it. 
Here is her necklace, and the link to the tutorial is below it. 

http://tatertotsandjello.blogspot.com/2010/12/guest-project-anthropologie-inspired.html?utm_source=feedburner&utm_medium=feed&utm_campaign=Feed%3A+blogspot%2FOivM+%28Tatertots+and+Jello%29

So thanks Little Miss Mama for sharing, I love her blog by the way


But anyway I made one and it turned out pretty darn cute I must say. 
Here is how it turned out: 
I used smaller lace than her. I couldn't find the cute lace she used, but thats what I get for trying to do one stop shopping at Walmart, the craft store is just so out of the way! But I bought like lacy ribbon stuff that had pearl beads sewn onto it, its not as tall as hers, but it still turned out cute and it was pretty easy to make as well. I had a few glue gun burns, but thats about all. I liked it so much that I made a matching headband. 


I didn't have any pearl beads or anything like she did, I thought I did, but then i couldn't find them, hmmm... But anyway luckily I had some scrapbooking brads. Yep I used them. You can't tell. I just hot glued them on and you can't tell the difference. But you should make one too, just go to the tutorial that i linked above. I was going to do my own tutorial, but why do all that work when there is already one right there??
But these pics don't really do my cute flower jewelry to justice, here is me modeling it. 


Like my sweater? Its a Christmas present from my mom, I begged her to let me have it early so I could wear it tonight at my husband's work Christmas party. Thanks mom. But thats what you get when you live out of state and have all your gifts shipped to my house so you don't have to take them with you in the car ride here when you come for Christmas! I can't help myself, I have to open them. 

Ugh this picture is off center, but I thought it still looked cute. My husband was taking the pictures of me, and I told him to get a close up of my headband, but he kept taking them too far away, so I took tried to take a few myself. Thanks for your help hubby. 

But anyway I already got a compliment and I just finished it today. But a girl about my age came up to me at my husband's Christmas work party and asked to see my necklace so she could see how the company had made it. I told her I made it and we talked for a bit about jewelry making. I was so excited! 
P.S. if you make this make sure you don't use too short of a chain. I made one with a shorter necklace chain and it was waayyy too short. It like was a choker, so I took another chain and like put them together, until I could buy a longer chain at the store. Luckily the parts that I hooked together hid behind my hair tonight. 


Dec 16, 2010

Slow Cooker BBQ Pork


Can I tell you how much I LOVE my crock pot?! It is the best way to cook ever. Except I have a hard time finding recipes for it. They all seem to include cheese, sour cream or cream of chicken soup for some reason, I hate all of those. But I still use my slow cooker alot because I can make roast or stew or chili, and one of my favorite recipes, BBQ Pork sandwiches. These things are so delicious. I found the recipe on a food website that I browse through often, and I tweaked it a little bit.

Here is what you need to make it.

Pork roast
Onions
Ginger ale
1 -18 oz bottle Sweet Baby Rays BBQ sauce
(Full recipe at bottom of post)


So first you get out your crock pot, mine is a bigger sized one so I love that. Put on a crock pot liner (if you don't have these, get them NOW, they are the best, you barley even have to clean up with them, you can use them with soup and everything).
Once you have the liner down put in half of your onion. Now the recipe calls for two onions, but my gosh that is a lot of onions, especially if your like me and buy the big ones. So I usually only use one, if that. I usually slice them up in rings. But today I had this one big onion that I had already taken a little portion out of and it ruined the ring slicing. so I just cut them however. Its no biggie.


Then once you have like half of your onion or so at the bottom stick in you pork roast. The recipe says 4 lbs, I have used like 5 or 6 or even 3 1/2  lbs before. It doesn't really matter, just put more BBQ sauce in at the end accordingly. I am not sure how big this one is. I got a deal on this huge thing of pork roast so I used half of it a month or so ago and then put the other in the freezer, its probably close to four pounds though... I make a few slits in the roast so it will cook evenly and then place it on top of the onions.


Now pour the ginger ale all over the pork. The recipe calls for one cup, but I usually do around two or so. So pour that in the crock pot, then I add some water to it as well so your liquid is about half way to 3/4 of the way around your pork. Now place the other half or so of your onions on top of the pork roast, cover and cook on low for about 6 to 7 hours. The recipe says for 9 hours, but it doesn't take that long, unless you have a really old crock pot.


So I usually start my roast at around 9 am, Then around one or so I flip the roast over. I then let it cook until around four or so. At four I take the roast out and shred it, I shred the onions with it too, but if you don't want them in there you can take most of them out. The pork should be like so tender that it just falls apart and shred easily. Drain the liquid in the crock pot, then place the shredded pork back in the crock pot and then pour 1 bottle of the BBQ sauce all over it and stir. Cover and cook on low for about 1 1/2 to 2 more hours (I usually take it out at like six if you started at nine).

The recipe suggested Sweet Baby Ray's and I am so glad it did, I can't have too sweet of BBQ sauce and this one is just right. It is super good. I don't think I can ever buy another brand of BBQ sauce after trying this brand. But if you have another brand you like, you can use that too, but  I would suggest Sweet Baby Rays.

Now your pork is done. I serve it on toasted buns and it is sooo good. Best sandwiches ever! And while there was a lot of writing, it really isn't hard, Jeremy says I take a while to tell stories and to describe things, so sorry!


Original Recipe from http://www.food.com/ (love this website)
Click here for full recipe.

(My suggestions are in parentheses)

4 lbs pork roast
2 onions (I use one)
1 c. ginger ale (I use around 2 c. myself)
1- 18 Oz bottle BBQ sauce (Recommend Sweet Baby Rays)

Slice Onion and put in crock pot. Put in roast. Then cut up other onion and place on top of roast. Pour in ginger ale (and I put in 1 c water as well). Cook on low for about 9 hours ( or 7 if you have newer crock pot) Remove meat and onion, shred and then remove all liquid from crock pot. Put meat back in and pour in BBQ sauce, stir. cook 1 1/2 to 2 hours more.


On a side note, 2 people from Canada, 1 person from Italy, 1 person from Spain and 1 person from Brazil have viewed my blog. Now I am sure it was just by accident and they probably just hit the 'next blog' feature and mine came up, but still I was feeling pretty cool.


Dec 9, 2010

I am a genius!


    So going along with yesterday's post, I did something with one of my vinyl phrases. So after I wrote yesterday's post I was thinking about what I should do with my vinyl since I can't just stick it directly on the wall, I dont' want to live in this apt forever. And then inspiration struck. I was sitting at my work computer in our office and I saw this old Ikea frame hanging up on my wall. I forgot to take a pic of what it looked like, but it was a rectangular frame with three different pics of New York City and frosted glass, it was more modern looking. I got the frame when I was at college, cause it looked cool in my college apt, but it didn't really go with my new design taste. Plus everytime my mom saw it she asked why I hadn't put pictures in it, I am always like, duh mom, thats how is supposed to look, its pics of New York, and it had like one of those paper backs that you can't open, so obviously the pics were artwork! But no one seemed to get it, so I just stuck it in the office on the wall cause it felt like a waste not to do something with it. I don't really decorate  my office, its always messy with scrapbooking stuff and I dont let anyone in there but Jeremy and I so it feels like a waste to decorate it. Anyway I am rambling...

So I took the Ikea pic off the wall and then mod podged on some damask card stock and then put my vinyl lettering right on top of the paper. It turned out super super cute!!

It says 'Home Sweet Home' its hard to read with the stupid glare.

But anyway I got this idea all on my own. So I was feeling pretty smart and creative. And it turned out soo cute!! I am so excited.

Dec 3, 2010

I went a bit crazy...

 So I went to this warehouse scrapbooking sale yesterday and basically I went crazy! They had so many things, and most of them for like a dollar each. It was freaking awesome. But here is what I bought.
6 things of paper
28 spools of ribbon (most of which is in that white box on the left hand side)
3 pckgs buttons
10 pckgs brads
6 pckgs stickers and rub ons
1 chipboard character pckg
6 pads of ink
1 stamp
1 paper storage box.
= $70!
Yeah I went crazy!!
I bought it all for myself for Christmas. I dragged Jeremy along so he could say he bought them for me for Christmas. What a good sport!

And no, I am not advertising for them, I just had some people ask about it, so I thought I would include address in case you want cheap scrapbook stuff.


Dec 2, 2010

Scrapbooks and more chalkboards.

 I have been so short on scrapbooking supplies lately, but luckily (thanks to my sis in law) I am going to a big warehouse sale soon and getting a ton of stuff!! Hooray. But last night at Ross (I love that store) I found a cute scrapbooking album for cheap, so I put all my pics that I have been working on in it. And I must say my pages have been looking pretty good. Haha, yes I am bragging. I make Jeremy look at these with me like everyday poor guy.
These are all the pics my other sis in law Sam Pierson took, she is great! She took us to Wheeler Farm and took pics of my family and then some of just Jeremy and I.
Glare!

Thats my pink xbox controller in the background, i don't know how to crop on my crappy computer.
So there is my bragging for the day. They aren't top notch but I don't like to spend a ton of money on scrapbooking stuff so I work with what I've got. Also, the pic makes my table look dusty, but its not. I dust it often!

Moving on, I also have been making chalkboards. I told you I didn't buy that can of paint for nothing.

Basically I just bought a frame at all a dollar, painted the glass with chalkboard paint (need 2-3 heavy coats) and then let it dry. Like I said in my last post you need to go over the chalkboard with chalk before you write anything on it, so just put that chalk on its side and roll it all over the board, this kind of like cultures it or something, I dunno, thats just what all the other blogs out thee that use chalkboard paint tell you to do. But I made a lot of these, I am giving them out as christmas presents. So chances are, if you know me, you will be getting one of these, sorry to ruin the surprise. I actually made these a while ago before I made my christmas countdown.

I made one for me to put outside our apt door. I thought it would be cute to have a little msg board out there. The frame was some really ugly gold color (not cute like the one above since I bought them at different times) so I just spraypainted it to be pink, cause I really like pink..
But anyway you can use them for a lot of things, after Christmas I am going to put one in my kitchen and make it a menu board. Basically you can put chalkboard paint on everything, I have seen it on cups, name tags, wood... Martha Stewart even shows how to make your own on her website. You just need sandless grout and paint and you can make it ANY color you want, how cool is that. You can paint your pantry door and write what groceries you need or recipes on it, or you can paint it on the bottom part of your wall for your kids to color on. I have even seen it on fridges, wow. Someday I am going to paint my pantry door with chalkboard paint, I think that is a cute idea, especially since you can make it a color to match your house.

Craftily Counting Down!


So I wanted to make a count down to Christmas, they are so cute and I love counting down the days, but all of the ones I have seen you either have to buy or sew, and I didn't want to do either. So I came up with an idea, why not make a chalkboard countdown to Christmas? Then I could easily just erase and chalk in the dates, easy peasy! So here is my tutorial on how to make this!


First, buy an unfinished wood frame. I bought this one for like three dollars at Hobby Lobby, the picture size is  5'7.
Next you want to paint the edges, the back of the frame and the inside. You can even stain it instead, but I wanted red.


While I was waiting for my paint to dry I worked on my chalkboard.
First you buy chalkboard paint, which I found at Home Depot, I think they have it in spray on as well, but I thought I would be using it a lot so I bought a bucket.
Next just put the paint right on the glass of the frame and paint. Now for some reason the frame I bought didnt come with glass, but that was ok, the back part that holds the picture in was made of like a flimsy wood or something so I just painted that, it worked just as well as the glass, actually better cause it went on smoother and I didn't have to do as many coats to cover up the glass. I did two coats of the chalkboard paint on the wood piece. It dries really fast.


Once your frame is dry you want to get your paper that you are gluing onto the frame. I used Christmas wrapping paper, but you could just use Christmas cardstock or something. I liked the wrapping paper cause it was shiny though. So you want to trace the outside and inside of the frame on the wrapping paper and then cut it out. Next grab your mod podge....
(this is mod podge, its like a glue that is awesome, you can put it right over pictures and stuff, its the best.)
So you get your mod podge and then paint it over your wood frame and then lay your paper/wrapping paper down on the frame and smooth it out. I did it in sections, it was easier that way I thought.
It should look something like this. After it was all on there I let it dry for a sec and then put in my now dry chalkboard piece. Before you write anything on the chalkboard you should go all over it with a piece of chalk. Then wipe it off with a damp cloth and write whatever you want with it.
Isn't it so cute?!
You don't have to do this as a Christmas thing either.
You can just get some cute cardstock, mod podge it on there and put in a cute picture that can stay up all year long. Its super easy and you can use this idea for a lot of things.
But here is the finished project in my kitchen!
Sorry about the glare, stupid camera.