Feb 27, 2011

Lacey Headband with Ribbon

 I made a new headband for myself. And I am loving it. 

It was easy to make you just need a headband, some lace and two different colors of ribbon and some pearl beads. 
You can go HERE for the tutorial at Borrowed and Blue. Hers looks better than mine, but mine is a bit more casual. And I picked brown cause it goes with a lot of things... 

For the actual headband, I just went to the dollar store, got a plastic headband and then put some lace on it with the glue gun. 

Ok, it actually doesn't go with this outfit, but I took the picture today and that was the outfit I was wearing at the time, but honestly I was wearing a different headband for the rest of the day... 
And Ick, I guess I should have brushed my hair better too... Not my best hair day... Oh well. 


Feb 26, 2011

We Have Our WInner

Thank you so much to everyone who entered the coaster giveaway. 
I used a random number generator at www.random.org and the number it gave me was lucky # 3. So the third person who left a comment was Lauren@theelephantstrunk. 

Lauren, email me at nessapierson@gmail.com to claim your prize. I need your mailing address so I can ship it to you. 

Thank you to all who entered. I will do another giveaway in a bit again. 
Is there anything you would like to see given away that I have done on here, a craft or something?

Feb 25, 2011

Last Day to Enter Giveaway

This is the last day to enter my giveaway. The giveaway ends at eleven p.m. tonight and I will draw the winner tomorrow morning. So make sure you enter today if you havent already. 
Click HERE to enter.


Feb 23, 2011

Framed Pom Pom Monogram


Here is my lovely craft project that I have been working on. I made a big P out of pom poms. 


Here is what I did, I used the Cricuit a while back when my aunt let me borrow hers to cut out a bunch of cute letters, I wasn't sure at the time what I would do with them, but I knew they would come in handy. 


Next I cut out a bunch of squares and glued them to the letters and the parentheses things (what are those things called, brackets??) I used the pom pom technique that I showed you in THIS post, but instead of using circles or flower shapes I just did squares, which is way faster. So I glued them to the letters, and then I had to kinda cut them down a bit too, so that they would kinda outline the shapes a bit more.
Then I had a silver frame that I bought from the dollar store that I had been meaning to use, I painted it black, which actually took a few coats, that silver frame did not want to be painted but it worked and then I put some scrapbook cardstock that I had inside the frame and then glued the letters to the glass. 


It was actually really easy, and didn't take too much time at all. I didn't like it at first when I just had the letters done, but once I got the paper in the frame and the frame painted it really all tied together and looked great. I am really liking it now. 
I also think it would be cute to just cut out the letters and put them on the cardstock in the frame, that could be cute too... I also think I might try making a P out of rosettes... 


Feb 22, 2011

pork chops and apple stuffing recipe

Sorry this is sooo late in the day, my power was out the whole day. And I had to go into work rather than working from home, which meant I had to shower, do my hair and make up all in the dark. It was freaky I tell ya. Oh and work at the office is so boring, I was dying there. Feel bad for me! :)

So one day I was super bored and started watching PBS, or some channel like that (because I spend my time wisely) and along comes this weird cooking show and this little old lady starts cooking up these pork chops and stuffed them with apples and stuffing, by the end I was drooling and so was my hubby who had eventually fallen into boredom with me and watched the cooking show too. But I wrote down the recipe, and have since made it several times and love it! It is super super easy too.

Pork chops and Apple Stuffing

4 boneless pork chopped and diced
1 Apple, chopped and diced in small pieces
1 C. Apple Juice
1 box Stove Top Stuffing


So I used small pork chops, they are so tiny and thin, but I had them in my freezer as left overs for another recipe, so I just worked with what I had. Plus I like when my meat is more thin.

First Step: Prepare stuffing as directed on box.  You can of course make your own stuffing the lady on tv made her own, but me and the hubs are really big fans of Stove Top, and the tv lady said you could use boxed kind anyway. It is way easier too. Once the stuffing is made, put your apple chunks into the stuffing and mix it around.

Step 2: Cut the pork chop open as shown in picture below, so you make a type of pocket in the pork chop (does anyone know what this process is actually called? cause I don't) Then fill your pocket with the stuffing with the apples in it. (the apples in the picture look HUGE, I think its just because the pork is so tiny... Also my pockets would have been better if the pork was thicker. 
Once you have done this with all the pork chops put them in a greased glass pan and press the rest of the stuffing in the pan. Pour the cup of apple juice in the pan over the stuffing. 

Bake at 375 degrees for 25-30 minutes until pork is cooked through. 

Serve pork with the stuffing.


Ahh don't look at my paltry salad. I didn't feel like adding anything to it! 

Click HERE to enter the giveaway for the tile coasters.


Feb 21, 2011

hmm....


Well Mondays I usually show you a new craft, but sadly I do not have one today. I am in the middle of two different crafts and I am not done with either yet! But I will be done with one of them by Wednesday or Thursday, so I will show you all then. But tomorrow I will feature a recipe for all of you as usual.
But in the meantime, don't forget to enter the coaster giveaway HERE!


Feb 18, 2011

Coaster Giveaway!

1Loving Life has made it to 50 followers. To thank all of you who read my blog I wanted to do a giveaway.
So I am giving away one lucky follower a set of tile coasters.


Remember when I showed you the tile coaster tutorial? Well I made four sets of coasters. So one of you lucky ducks gets the red coasters that are shown above. 
I have a set that I made and I am loving them. They have felt on the bottom so they don't scratch your table, and they hold up so nicely, and let me tell you, I have spilled a ton on mine and they are doing great. 


So you can enter three ways, leave a SEPARATE comment for every entry you do. To enter the first entry is mandatory, the other ones are not.  

1. First you MUST be a follower of Loving Life to enter the giveaway. So if you are not a follower already leave a comment below to let me know you are a new follower, if you are already a follower also leave a comment below telling me your a follower. (This is a mandatory entry)

2. For an extra entry you can blog, tweet, or post on your Facebook about this giveaway. Come back after you have done so and leave a comment letting me know you did. 

3. Leave a comment telling me your favorite recipe or craft that I have shown you on this blog. I just want to get a feel for what you guys like. 

This give away ends on Friday, February 25 at 11 pm. 


I am so excited to give these away to one of you. 


Feb 14, 2011

Homemade Chicken Noodle.

Well winter is almost over (Hopefully!!) but we still have plenty of cold days left I am sure. Here is my favorite recipe for Chicken Noodle Soup. My mom has made this recipe for forever and I love it. Homemade Noodles are the best. This was my first time making it and it was really easy. It is going on the old rotation now.


Here is the recipe copied straight from my momma's blog ( I would give you the link, but she never writes on her blog so it would be a waste of time.)

Homemade Noodles:

1 C. Flour
1 Egg
1 tsp Salt
Combine ingredients. Add water. Roll thin. Slice and boil. ( I use a pizza cutter to cut thin strips about 1/4 in. or less is best) These noodles are what makes this soup so tasty!


Soup:
3-4 chicken breast (boneless, skinless) cooked and chopped into small pieces
6 C. Water
2-3 chicken bullion cubes
1 can cream of chicken soup
1 c. diced celery
1/4 onion
2 c. baby carrots or diced carrots
Salt and pepper to taste

.In large pot boil water, then add noodles, bullion cubes, carrots, onion and celery to water. Boil until noodles are done and vegetables are tender. Add chopped chicken, cream of chicken soup, and salt and pepper.

Now I made a few changes. I used 2 14 oz cans of chicken broth and 3 cups of water, and I don't like cream of chicken soup, I don't know why but its gross to me. so my mom told me to add one small can of chicken noodle soup. I added it and it was yummy, but I didn't think it was necessary at all. Next time I think it would be okay to just add one bullion cube to it and it is fine. The noodles also add as a thickener too r since they have all that flour on them.

The noodles are just so good!


Update: 
I love to add pureed vegetables in my food now, and this is a great recipe to pump up your vegetable intake, you can read all about it HERE. A great way to do this is to add carrot puree to the broth (along with the cut up carrots that are already in the soup). It doesn't change the flavor of the soup and you are getting even more vegetables! 


Feb 13, 2011

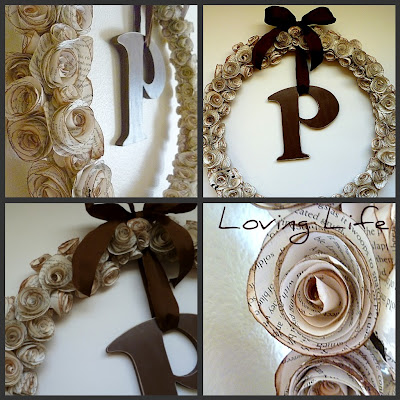
Book Pages Wreath

So here is the project that I worked on the last week and a half. I made a wreath using book pages and I am not going to lie. I just hung it up yesterday and I am loving it. It turned out so great!


Here is the tutorial on how to make it:

You need a book, I got a book about 400 pages long at the dollar store. I didn't want to use any of my books, I like them too much! Rip out some pages, I think I used a 150 -200 pages or so.
Start off by cutting out a circle in the pages, I used a bowl to trace my circle, so about the size of the width of a average bowl. Then You cut the circle into a spiral as shown in the picture above. Then roll up the spiral to form a kind of flower shape. Start rolling from the outside of the circle and keep going to the inside of the circle. Start out small and tight and then make your circles bigger as you go, glue it all together with your gun it all together at the end. I suggest gluing as you go as well so that it doesn't all unravel when you get done. I also tried using Elmer's glue cause I always burn myself with the glue gun, but the elmers didn't dry quickly enough, so it didn't really work so I took out the trusty old glue gun and used that and it worked so much better and I actually didn't burn myself this whole project, not too badly at least.
Once you have your pages rolled into flowers, take a brown stamp pad and rub it along the flower's edges to give it a burned edges look.
Now make llike a hundred more flowers!


Next I took a large cross stitching hoop (is that what it is called?) as the base of my wreath. You could use a styrofoam wreath too, but I had the hoop so I decided to use that and it worked out pretty well.
Wrap a few of your book pages around the wreath to start out with. Now take the flowers and glue them on the wreath. I did them on the top, then put more flowers on the sides of the wreath. I tried to make them all kind of face the front of the wreath so you could see them. Once you have all the wreath pretty much covered, I made some small flowers ( I used a cup to size the circle) and I put the small flowers in any empty spots to make the wreath more full.


Now top it with a pretty brown bow and you are done.
The rolling of the flowers is pretty easy but it really does take a long time, It took me about a week to do them, and I did them most of the day while I was working... So it is definately a project that takes time, but if you know that it will take some time, just do it on your down time when your watching t.v. or something.
I also wanted to put something in the middle of the wreath. So I got a wood P at the craft store, and so I painted it with some brown paint, sanded the edges down and hung it up with more ribbon in the middle of the wreath.


Feb 10, 2011

So I am thinking.... a giveaway soon perhaps???!

Well this blog is awfully close to 50 followers! I am so excited. Thanks to all of you who are following. It definately makes me want to blog more when I know more people are reading. I hate writing if no one is reading anything, its like whats the point?

So to say thank you for all of you giving such a great listening ear I thought I would do a giveaway once I got to 50 followers. What do you think??


Laziness and Warm French Dip Sandwiches

I have been so busy lately. Okay, maybe busy isnt the right word, I guess I have been LAZY lately. Really I like havent even wanted to like do my hair or makeup lately. I think its because of winter time, I am going to blame it on the snow. And to all of you out there across the U.S. who think you get a lot of snow, you are wrong! Utah gets the third highest snow fall in the nation (so said an article on Yahoo! that I read a few days ago) Colorado gets the highest and Utah is only like a inch below them on average, so we get a ton here!! And I hate the snow and the cold. It makes me not want to do anything. So these last couple weeks I haven't done anything. So that is why my crafty posts have been a bit far apart. Plus I finally got done with this other project that you will see next week, and it took me forever to get done!
But anyway, here is a quick recipe for French Dip Sanwiches.
I love French Dip Sandwiches, they are so warm and toasty and great for winter time.
And these are sooo easy to make.

1 pckg Lipton Onion Soup Mix
1/2 lb Roast Beef
Provolone Cheese
Rolls or French Bread

Make the onion soup mix according to directions on box.
I just get Roast Beef in the lunch meat secion, prepackaged, cause I am cheap, but it works. You can get some good roast beef at your grocer's deli. Once onion soup mix is almost done, pull apart pieces of roast beef and put them into the onion soup mix cook until everything is warm. Now with slotted spoon take out roast beef, put it on bread, I guess for French Dips you should use french bread, but I used my roll recipe cause I love those rolls.Place Provologne cheese on top of roast beef.  Now in shallow bowl or cup pour in onion soup and use that as your au jus and dip sandwich in that.
Perfectly delicous and easy!

They also have au jus packages in the like seasoning aisle, where they have the gravy packages and the taco seasoning stuff, but I haven't ever tried them.

So this makes a great dinner or lunch for you on a cold day!


Mine is the sandwich with no cheese!!


Feb 9, 2011

Pom Pom Tutorial

Wanna learn how to make cute pom poms?? I am obsessed with pom poms right now, they are so much fun, and you can put them anywhere, you can use the pom pom technique for wreaths, hair clips, decorations to like frames, and cards and scrapbooks like I showed you the other day.

Step 1:
Get your fabric and then cut out a flower shape. It doesn't need to be perfect at all! You can also do circle shapes or square shapes, they all work. I like the flower shape the best cause it makes a lot of dimension in your pom pom, but honestly it takes longer to make. Cut out a gagillion (its a word...) of these shapes, probably around 12-15 depending on how big you want your pom pom to be.


Cut out a piece of felt in a circle. This piece is what you are going to make the base of your pom pom out of, you want it to be a little bit smaller than what you want the end result to be, the pom pom grows, and if you cut out a big circle of felt, you are going to have to make a huge huge pom pom. So go small!

Step 2:

Fold up your little flower or circle shape. So fold it in half once, and then fold it in half again, so it should look like this at the top:
And then have a point at the bottom. Put a little dot of glue at the bottom of the point and glue this to the center of your felt circle. Do this a million more times and eventually you will get your pom pom.
Sorry I didn't take any pics of a half done pom pom, I was doing this while I was working and kinda forgot...


Here is the pom pom! I love it.
Once you are done you will want to kinda poof it up so it all blends together, and you may even have to add a couple more of your flower shapes to it to fill in any gaps you wanted.


Feb 4, 2011

Melt In your mouth buttery rolls.


Oh my goodness I can't even begin to describe how much I love these rolls. They are my most favorite rolls ever! I don't even remember the last time I actually bought rolls at the store, after these rolls I just cant do it. Neither can my husband, he aboslutely loves these rolls. Like really he gets so excited whenever I make them. And they are sooo easy! They are also from Ms. Betty Crocker and her fabulous cookbook. She never fails!
( I have included the regular recipe and the bread machine recipe below )

Dinner Rolls
3 1/2 c. All purpose Flour or Bread Flour
1/4 C. Sugar
1/4 C. Butter or Margarine (softened)
1 tsp Salt
2 1/2 tsp yeast (or 1 package)
1/2 C. very warm water (120-130 degrees)
1/2 C. very warm milk (120-130 degrees)
1 large egg
Butter or Margarine melted if desired

1. In a large bowl, stir 2 Cups of the flour, the sugar, 1/4 c. butter, salt, and yeast until well mixed. Add warm water, warm milk and egg. Beat with electric mixer on low for about one minute. Beat on medium speed for 1 minute, stir in remainding flour.

2. Place dough on ightly floured surface. Knead about 5 minutes or until dough is smooth and springy. Grease large bowl with shortening. Place dough in bowl, turining dough to grease all sides. cover bowl loosley with plastic wrap and let rise in warm place about 1 hour or until dough has doubled in size.

3. Grease bottom and sides of 13X9 " pan.

4. Gently push fist into dough to deflte Divide dough into 15 equal pieces. Shape each piece into a ball; Place in pan. Brush with melted butter. cover loosley with plastic wrap and let rise in warm place for about 30 minutes or until dough has doubled in size.

5. Heat oven to 375 degrees. Bake 12-15 minutes or until golden brown.


Now I have never actually made them that way, all that kneading is just not for me. I guess if you have one of those awesome Kitchen Aid mixers they have a kneading blade and will knead it for you, but I don't have one of those, so I use one of the loves of my life, my bread machine!!! One of the best birthday presents ever! Thank you husband. Haha for my first birthday that we had since we had been married I asked for that machine and my husband did not want to get it for me, he said he thought it was a lame gift. But I had always wanted one, and I love that little machine. It is so amazing. So here is the recipe if you want to be lazy like me and let the bread machine do all the work.

Dinner Rolls (Bread Machine)

3 1/4 C. Flour
2 Tbsp Butter (softened)
3 tsp yeast
1 C. room Temperature water
1/4 c. Sugar
1 tsp Salt
1 egg
butter or margine melted if desired

Place all items except melted butter i bread machine in order directed by the manufacturer. Select Dough/manual cycle (don't use delay cycle) Once the cycle is done, remove dough from pan and continue with steps 3-5 above.

I also put butter on them after they are done too.


I still need a good recipe for wheat rolls though. I love these rolls, but with the white flour they aren't super healthy, I want a healthy alternative to make once in a while... Any suggestions??


Feb 3, 2011

Valentine Pom Pom Cards

Yesterday while I was working, I made a couple Valentine Day cards


I have a few special people I wanted to send some cards to to wish them a happy valentines day.
I hope they like them.
Just made the cards from cardstock, added a cute pink paper and a fabric pom pom.
The pom pom tutorial will be coming next week!

HERE IS THE TUTORIAL FOR POM POM'S

Feb 1, 2011

Chile Verde Burritos

This is a recipe that comes from my dad's family.
These burritos are soo good. And easy to make.
I gave them to the hubs to eat for the first time and he was in love!

Chile Verde Burritos

2lbs Pork, cubed
1/4 C. Flour
3 Cloves Garlic, minced
2 Cans Original Rotel
1 can Green Chiles
Salt and Pepper to taste
1 Tbsp Corn Startch
2 C. Water and 2 tsp Water
6 Potatoes
Flour Tortillas
Mozarella or Cheddar Cheese

1. Slice potatoes thinly, in pan cook potatoes with a small amount of oil and add salt and pepper to taste. Cook until potatoes are cooked through and soft.
2. While potatoes are cooking, get ziplock bag, pour 1/4 c. flour in baggie, add pork in bag and shake until the pork is coated in the flour.
3. Heat about 1 Tbsp oil in pan, once it is pretty hot, pour pork in the pan and cook pork until pork is cooked through and browned.
4. Once pork is cooked, pour into the pan with the pork 2 C. water, rotel, green chiles, and garlic.
Bring to a boil. If the misture is too thin, add corn startch to thicken. I find that this works best by putting the 1 Tbsp corn startch with 2 tsp water in a baggie, with your fingers work the corn startch mix in the baggie until it is mixed and there are no lumps (this prevents lumps in your sauce and works absolutely great in gravy)  pour corn startch mix in the sauce mixture, mix and simmer sauce for about 5 minutes.
5. Now get your tortillas, put in some potatoes, pour in the chile verde sauce and add some cheese. I like to add the chile verde sauce on top of the burrito too.


I am sure there are tons of versions of chile verde out there, and maybe mine isn't too authentic, but I really love these, they are easy and so good. Hope you like them too.