Dec 13, 2012

Simple Wood Nativity


I love nativities, but holy cow, they are expensive. I someday would love to have a collection of them, so when I saw all the different simple wood natvities on Pinterest I had to make one too. I loved how they were wood, because that just seemed so perfect. Christ was a carpenter, and of course a very simple and humble man, he wouldn't need anything extravagant. So I thought the simple nativity fit well. 
It was pretty easy to make, I made 7 of them so it took more time making that many. I am giving them out as gifts to some family members, like our moms and such. 

To make these you need: 
1- 6" 2x2 piece of wood for Joseph
1-5" 2X2 piece of wood for Mary
1-3"x2" piece of furring strip. For baby blanket
2- 1 1/2" ball knob For adult heads
1- 3/4" furniture button for baby head or 1/2" depending on how big your wood piece, see below.
1 popsicle craft stick
1 wood star
long piece of Jute
paint of desired colors
Wood glue

You can get the 2x2 pieces at a hardware store. I got mine at Lowe's. They come in really long pieces and so you just have them cut it if you can't yourself. They charge $.25 for each cut and about $1.50 for the whole long 2x2. I got lucky and this really nice old man who worked there cut the pieces for me for free. So I got enough wood for 7 nativities, and one extra long piece that was too short for the machine to cut all for $1.50.  I forgot to get the wood piece for Jesus' body. But I found these like wooden gift tags at Joann's for a dollar for 7, so I cut those so that they were just rectangles and not tags. But the tags were a little wider than the wood piece in the original picture, so I had to buy bigger wood balls for the head. the original picture calls for the smaller button. 


Sand your wood pieces. Paint everything your desired color. I then used gel stain and applied that. Then I glued everything together. I used the popsicle stick to attach the star to the back of Mary. I added the jute and my little tag and was done! I really like how it turned out, I hope everyone I made them for likes them too. 


HERE IS THE ORIGINAL You can find the tutorial for this one over at Learning to be Me.


Dec 12, 2012

Personalized Accordion Cards


{Card for my sister's birthday}

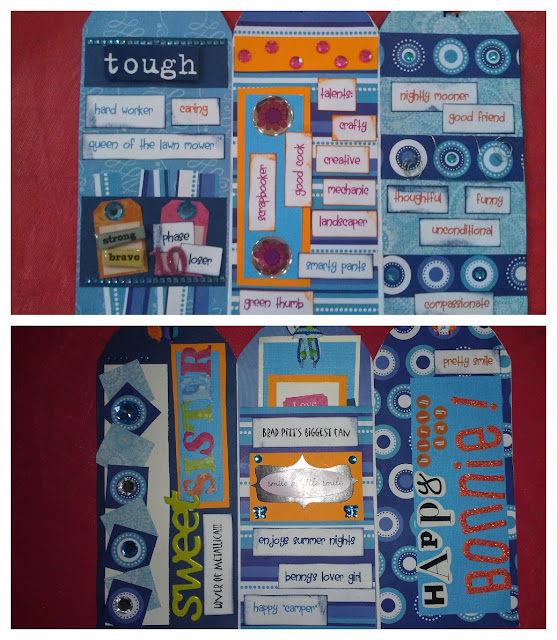
My mom is the master of card making. She whips them out like crazy and has a whole box full of cards she has made, and they are all so cute! But the cutest cards she makes are these cards that open up like an accordion and are super personalized and fun! They are seriously my most favorite cards ever! 
She adds stuff all over them that are fun inside jokes, or good qualities about you and the card totally is a reflection of the person. They do take more time than a regular card, so she only makes them occasionally, but they turn out well worth it, and are soooo much better than getting a generic card from the store, or even a homemade card that could be for anyone. 
So she made a couple recently and I begged her to send me some pictures of them and tell me how to do it. 
So here is how to make one of these great cards!

1. Get a 8X11 Piece of plain paper
2. Fold the paper 3 times equally accordion style. (so you alternate the folds), this means you will have three panels on each side, so 6 panels total. 
3. Cut the top of the paper to your desired height and round the tops on all 2 panels. 
4. Cut patterned or glittered, or colored paper out for each panel, its fun to do each panel different colors or patterns that all tie together. Glue the paper onto the plain white paper. 
5. Add embellishments all over, you can use stickers, ribbon, wire, rhinestones, more patterned paper, glitter, or paper punches. You can also add pictures, or baby pictures of the person if you have those. Add stuff that reflects the person's personality. It is good to add their name, maybe a cute personalized note, and then add words or sayings about that person. Like I said before, their good qualities and inside jokes are always fun. 
You can use sticker letters or print stuff out on your computer or use a combination like my mom does. My mom likes to use an ink pad to color the edges of the card-stock when she prints out the paper. 
Also my mom usually makes a book mark and adds it to the card, on one of the middle panels she makes a pocket out of the cardstock and then adds the bookmark there. I love the bookmarks. You can see the bookmark in the picture below with the Taylor Swift Sticker.

6. While glueing everything down and adding embelishments make sure the card is folding nicely. If you use a thick paper or glitter paper, don't add too much glue or it will make the card buckle. 
7. Use a hole punch to cut three holes in the top of the panels. Then add ribbon to it and tie it off. My mom usually uses 3 different kinds of ribbon or yarn or whatever to add texture and fun! 
This card is based off of Taylor Swift's RED album and Christmas. My mom's friend asked my mom to help her make. The card is a gift for my mom's friends daughter and will have Taylor Swift concert tickets in it. I guess the girl really loves Taylor Swift (who doesn't?)

{This card my mom made for my aunt, so her sister, for my aunt's birthday. The picture shows both sides} 

{This is both sides of the card she made for my sister's 15th birthday. And in case you are wondering what 'Feed me Faster' its an inside joke. My sister got surgery on her nose earlier this year and on pain medication made my mom spoon feed her ice cream and then told her to 'feed her faster' hahahaha, we will never let her live it down.}

 But the whole idea of the cards is to be personal and fun. These are cards people usually only get once or twice in a life time. I still have the one my mom gave me when I was in high school. But living in an apartment makes me keep it in storage, so I couldn't take a picture of it. But she had baby pictures of me on it and everything. I love that card! 


Nov 28, 2012

Lunch Pita Pocket

I love these pita pockets. I make them several times a week to eat for lunch. They are so delicious, and pretty healthy.


Lunch Pita Pockets:
4 slices of chicken lunch meat (I use Oscar Meyer Oven Roasted Chicken) Sliced
1/4 c. spinach, sliced up
1/8 C. onion chopped
1/2 tomato chopped
1 TB Ranch dressing
salt and pepper to taste
1/2 pita (I recommend whole wheat)
Slice and chop up all your stuff, put it in a bowl add salt and pepper and ranch dressing, mix everything up. Then put it in your pita pocket, enjoy!

A lot of the times I slice up extras of the tomato and onion and spinach and put them in the fridge so I only have to cut up the veggies once that week. In the picture I have shown two pita pockets, sometimes if I am more hungry I will make more of it and put it in two pockets (so a full pita is used).
Make sure your pita is also the kind with he pocket, some of them don't have pockets, I have made that mistake a couple of times.


Nov 27, 2012

Sesame Street 1st Birthday (on the cheap)

It was A-Cake's first birthday party last weekend. It was a total success, she had so much fun, and man-oh-man she was spoiled. I don't think I have ever seen a kid get so many presents. 
I also can't believe my baby girl is one! It is crazy, I feel like she should still only be a couple months old.  
I don't think parties need to be expensive, some of these parties on Pinterest seem like they cost at least a hundred dollars! I love my A-Cakes, but she is one, there is no reason to spend a hundred dollars on a party she will never remember (I don't think I would spend that much on a party, ever...I'm cheap) 
This party, including the cupcakes and everything was about $30.00 (thats the cupcakes, silverware, plates, etc.)
A-Cakes LOVES watching Sesame Street, its the only show she really watches. I put it on for her in the mornings when I am just waking up. She seems to really love Elmo, so she has quite a bit of Sesame Street products. So I knew that had to be the theme of the party.
I invited 43 people to the party, and most of them showed up, so that was way too many for our apt, so my lovely Aunt was kind enough to let us borrow her house for the party, Thanks Bonnie! 

For the table decor, I used some of A-Cake's Sesame Street Stuffed animals she had (I got these animals at a garage sale last summer, they are baby characters which I think is so cute!)
I also had pictures of her on the table, I already had the 8x10 frame, and the smaller frames I got from all a dollar (thanks Samantha Stephenson Photography for the one year old pics of A-Cakes).

Okay, isn't that plate the cutest? It used to be my husband's when he was little. 
The cupcakes we got at Sam's Club. I don't have a card there, but my momma does and she was in town so she ordered them and picked them up for me. They are so cheap! $13.99 for 30 cupcakes!!


I put candy on the table, pixie sticks and gummy worms and put labels that said: Oscar's Slimy worms and Abby's pixie dust (as in Abby Caddabby). 
As party favors I gave out crazy straws, but just to the kids that were there. I bought two packs of 6 crazy straws at the dollar store, the kids were having fun with them it looked like. 
I also baked cookies, snicker-doodles and my oatmeal chocolate chip cookies. Because Cookie Monster would be appalled if I didn't serve cookies at a party. 
I got the plates and table cloth at the dollar store, and then the cups and silverware at Wal-Mart. I also bought some soda at Wal-Mart for $0.84 each. I also bought a gallon of ice cream. 
I made pretty much all the decor myself (besides the animals and plate) I borrowed my aunt's cricuit cutter for the letters, but the rest of it, like the characters, I did free hand. 
I made this banner, it was pretty easy to make, I just had to cut out eyes and mouth for each character. I did Zoe, Oscar, Cookie Monster and Elmo. I also added pictures to it so you could see how A-Cakes had changed and grew over the year. I hung it with some yarn and clothespins and used tape on the wall to hold it there. 


The invitations!
I hand cut all these invitations out. Next time I am getting a circle punch at least, I can't believe how many circle eyes I had to cut out, what a nightmare. The invitations turned out cute, I liked them. But I messed up on them, big time. I found the pic on Pinterest, but no where could I find the tutorial on how to make them. But you are supposed to cut a big circle out and then fold it in half, put the information on the inside of the circle. I cut the circle in half. My husband took one look at the picture and said, weren't you supposed to fold it? I was so mad at myself, it was way obvious. but oh well, I doubt anyone noticed, they were still cute. 

I made a happy birthday sign for the door, and then on the walkway leading up to the door I had monster footprints. I also cut out squares and put the letter A and number 1 on the squares to look like blocks. I did a bunch of them and put them all over. I wanted balloons outside, but there is some weird helium shortage, its crazy. 
We had 3 games at the party. Since the party was mostly adults with a few kids I had to plan games that all ages could play. So I hid 3 of Ernie's rubber ducks around the place and the first person to find them won a candy bar prize. Then I filled 2 jars up with candy (jars at the dollar store) and you guessed the amount of candy in them. The closest person won the jar. And then lastly we played 'Guess that Sesame Street Character.' That game was my favorite. We made a slideshow of Sesame Street Characters and you had to guess who the character was. Since it was a lot of adults no one got all of them right. My mother-in-law won! Which is amazing since she hasn't watched it in years, go KERI!! But I gave out a candy bar prize for that as well. All of the games were simple and no one had to participate. I had them going throughout the party so it was just something that they could do on their own time. 


This girl hated everyone staring at her while she ate her cake. Once everyone stopped looking at her, she was fine and ate every single bit of that cupcake with a smile. 


Nov 14, 2012

30 Weird Things about me

I have some quirks that I think are a little bit weird. Well, actually, I think they are perfectly normal, everyone else just thinks they are weird.

  • I dislike most white foods.  The exceptions are whipped cream and mashed potatoes.
  • I probably have worse vision than your grandmother. I am that blind! 
  • Dogs are not my friend. I actually pretty much hate them. I would much rather have a pet turtle.
  • Aqua is the greatest color. 
  • I am one of the few humans alive that actually likes Wal-Mart.  Hey it has everything there in that one store. I rarely have to go anywhere else. Sometimes I even buy my clothes there, yes, I am that person. 
  • I would usually rather have my husband bring me home a big chocolate shake with hamburger and fries than a bouquet of flowers. Hmmm.. Maybe this is why I need to lose 10 pounds?
  • In the past week I have broken 4 of our glasses. In our 3 years of marriage, we have had two ten packs of glasses, we are now down to 4 glasses. 
  • Driving freaks me the crap out!  Really it gives me anxiety, but I have been driving a lot more this past year, I have driven to the airport twice! But I still won't drive downtown. 
  • My usual time span for reading a book is one day. 

  • I played dolls until the 9th grade. I only stopped because some of the boys in my neighborhood saw me and made fun of me. 
  • I would seriously rather clean toilets than do laundry.   And I don't use a toilet brush, I just use a scrubber and my hands, no gloves. And wash my hands forever afterwards. Yes, I hate laundry that much. 
  • When I was a teenager my mom threatened to stop from reading instead of taking away my cell phone or grounding me. 
  • I am pretty cheap, I won't pay more than $15.00 for a shirt. and $15 is kind of expensive. I feel ripped off when I spend that much. 
  • I HATE cheese. 
  • When I eat pizza, I take off all the toppings and put them in a pile. Then I take off all the cheese (which my husband says looks like zombie skin) and then pile the toppings back on, and eat. 
  • I have to Clorox Cleanup my counter about 4 times a day. I have to know its clean! 
  • I don't have a favorite band, or singer. I usually only like one or two songs from an artist. 
  • Calling businesses scares me. I have gotten better at this, but it still makes my stomach do a flip flop. 
  • I don't care for fruity ice cream. Its a waste of calories. CHOCOLATE BABY! Other things that are not worth the calories: White cake, bavarian filled doughnuts, skittles, and starburst.
  • Its a good day if I shower before noon. 
  • I can't match colors to save my life
  • Another food thing I hate, Ketchup, it freaks me out. I won't eat it on anything but hot dogs and hamburgers, I won't eat it on fries, or meatloaf or anything of the kind. I think seeing the gross crusty stuff that gets on the lid skeeves me out. 
  • I have never broken a bone, the most injured I have ever been is slicing a huge cut open in my head when I was 3 at the swimming pool, while I was swimming. How does that even happen at a pool?
  • I don't know how to work ITunes. My husband does it for me, and he is excellent at it. 
  • I won't read a book or watch a movie unless I know it ends happy. I will either read the last page of the book, or read about the movie online to be sure. 
  • My husband and I met at our church during a lecture on how boys need to take girls on dates more.  Lecture worked I guess. 
  • When I was in Elementary I loved bugs. I brought a grasshopper to my 2nd grade class in a mason jar with holes in the top for about a week to take care of it. And in 3rd grade my friend and I looked for slugs around the playground and put them in our pencil box and played with them in class. I had about 13 snails and slugs.
  • Along the same insect line, I didn't always take care of the bugs. I also dissected the bugs. I won't go into detail, but it did involve taking legs off of spiders. Now if I see a Spider I freak out, I have to spray it with spider spray to kill it about  foot away. Spiders seem smart, they know what I used to do to their comrades. 
  • I pee my pants when I sneeze. Usually this problem happens after having a baby, but its always been a problem for me. 
  • When I was younger I played house with silverware and toothbrushes.

Nov 7, 2012

How do you view the blogs you follow?

I need your help? I want to know what is the best way to view the blogs that you read. 
I usually use Blogger. It gives me a feed of all the blogs I 'follow' and shows me posts from most recent. I really like how it shows it, it gives me a little picture and then shows me the first few lines of the post, so I can see if its something I am interested in reading. 
But lately I have been having some problems with it. Some of the blogs I follow don't show up in my feed at all. For a while I just thought those people hadn't posted in a while, but when I went to their actual blog, I missed like 20 or so posts, but blogger is still showing I follow it. My feed also sometimes shows blogs that I don't follow anymore, which is annoying to sift through all of those. 
Another problem I have is sometimes I find a blog I like (Pioneer Woman, Tip Junkie, etc.) that do not have an option to 'follow' them in blogger. And so I never ever view their blogs because I forget to look at them since its not on my feed. But I would love to follow them. 

So what are my other options? I have seen that you can follow blogs by email, but I really don't want to do that, I know I would never read any of that stuff, I would get so many emails a day too, that it would drive me crazy. I also follow blogs on facebook, but facebook is changing its ways and I know that you don't see all of the person's posts if they are a business like some blogs. What is RSS feed? I have heard of it, but not quite sure. 
I am asking this question so I can follow and view more blogs, and also so I can update this blog a little better and be more convenient for my readers. 
PLEASE let me know what you do in the comments. I appreciate it so much! 

Oct 31, 2012

Italian Sausage and Lentil Soup (Carrabba's Copycat)


I went to Carrabba's Italian Restaurant a month or so ago. My daddy is a General Manger for Outback Steakhouse in Albuquerque, and the restaurants are owned by the same company, so when he is in town, we get to eat with him at Carrabba's for free (and Outback too, yum!!) I got this soup before my spaghetti and it was soo good. I liked it even better than my pasta. So I immediately went home and looked for the recipe, and found it over at Food.com. I made it a couple weeks ago and it was just like it. And it made a ton. We had it for dinner two nights and lunch one day, and my husband had it for lunch another day. I should freeze it next time. 
But I made a couple changes to the recipe, but you can find the original HERE.


Italian Sausage and Lentil Soup (Carrabba's Copycat)

1 lb Italian Sausage
1/2 onion, diced
1 butternut squash or zucchini, chopped
1 C butternut squash or zucchini puree (optional) SEE PUREE POST
4 C Chicken Broth
2 C Beef Broth
1-2 C water
1 chicken bullion cube
2 TB chopped garlic
1 Can diced Tomatoes
2 C Dry Lentils
2 tsp Salt
Basil
Oregano
Red Pepper Flakes
Black Pepper

Parsley 
Thyme
Garlic Powder


Directions: 
Brown Sausage with onions, drain fat. Add garlic, cook about 30 sec. 
In large pot, add all ingredients, including Italian Sausage. 
Bring to a boil
Reduce heat, cover. 
Simmer about 1 hour until lentils are tender.
Sprinkle with parmesan if desired. 
Serve! 


Oct 29, 2012

2 X 4 Pumpkins

This is cheap craft, which I like. It was one of those I made at my Auntie's weekly crafty days. 
I didn't have to buy anything for it. They had everything, down to the wood and the paint ready for me. 

Here is what you need: 
2 X 4 Wood: Cut from biggest to smallest
Orange Paint
Sand Paper
Gel Stain 
3 Nails
Green Fabric or Ribbon

Paint your 2x4 wood. I didn't sand it down. I wanted it to look rustic-y, if you want it more cute-sy then you can sand it, but I hate sanding, it is the devil, so I won't sand if its not necessary. After paint has dried you can sand the edges, I did, for the rustic look. That easy sanding doesn't bother me a ton. Then  use your gel stain to make it rustic. Paint on the gel stain, then use a dry paper towel to rub it in, then get a wet paper towel and wipe off most of the stain. Let it dry. 
Get the nails and hammer one into each of the pumpkins at the top. Wrap a cut piece of fabric around the nail and tie a knot. Done! So easy. 
You could make it a little more different and add glitter paint, or make them jack-o-lanterns by painting black faces on them. 


Oct 27, 2012

Serial Killer Themed Halloween Party

So I am a creep. I love to watch documentaries on serial killers. I know, I am morbid. But they are super interesting. Luckily I have a couple of sister-in-laws who share my gruesome interest. And last year we tried to all watch serial killer documentaries together but there were none on Netflix to watch. This year I was prepared. I bought a DVD set on Amazon called 'Most Evil,' which is a Discovery channel documentary that gives an overview of the serial killers and rates them on a scale of evilness. I also checked a documentary video out at the library in case the DVD set I bought was lame. 
But I had to set the atmosphere, so a little decorating was in order. Like I have said before I am cheap, so I just went to Dollar Tree and got the scariest things they had. Most of the stuff was kinda cutesy, which was soo not my theme. I wanted a severed limb, blood type of theme. And I gotta say, even with the dollar goods, I think I pulled it off pretty well. 
I got some severed fingers and some eyeballs, but they looked so lame just sitting on the table, so I put them in water. I thought, hey some of those serial killers keep the body parts of their victims, so that is what I went with. 

So here are the severed fingers. They were already bloodied, so that was good, the bones looked so fake though, and I was worried that no one could tell what they were without close inspection, so I painted the fingernails. Yes, I painted fake severed finger fingernails. It was weird... Then I got a canister, filled it up halfway with some water and some fake blood. The fingers floated, and then the blood sank at first, but then eventually mixed up with the water and looked gross, it was perfect, and in the water, the bones didn't look as stupid. 

Here is my table scape. I just swirled fake blood all over it, I did it the night before so it would be sure to dry. Its not very bright in my kitchen, so the picture didn't turn out amazing, but I think it looked better in person, with lamps as our only lighting. I had a headstone from the dollar store, I put fake blood all over it. Then I took some kitchen knives and put them on the table, it would have been great if the knives had blood all over them, but I just got those knives and I didn't want to put fake blood on them. I also bought some little skeletons, they were supposed to be a garland, but I had no where to put the garland, so I just put them around the table. They were a favorite actually, everyone ended up playing with them all night. 
Then the food went in that big middle space, so it wasn't so empty. 


This was a liver. Some of the serial killers not only keep pieces of their victims, but eat them as well... I know, its sickening. But I was going for gruesome here folks, so I put a knife and fork by the liver to show it was the serial killer's dinner. 

A lot of these serial killers like to be classy, in their own way. So I put my fake eyeballs in a vase with some fake flowers and water. And like the fingers, they looked much more twisted and gross in the water, the water makes them look so much less lame... 


Fake blood swirls. The only fake blood I could find was fake vampire blood that came in a little tube, it worked fine, but I would have loved for big huge splatters, but I settled for the little smears. I put my thumb prints in some of them to look more gross. The table cloth was just a dollar store one as well, I just threw it away afterwards. 


These are my invitations I made. I only invited three couples, I really wanted a knife dripping blood on them, but when I tried to make a paper knife it looked like a 2nd grader art project and not scary. So I just focused on trying to make blood. I made the blood marks out of red ink that I already had. I ran the ink pad over the paper and then I pressed my thumb in the ink and then made red thumbprints all over too, I dragged my thumb around some parts, to give the appearance of a struggle.


This side I just used some Halloween paper I had on hand and then ribbon and the skulls were made with skull rings that I bought at the dollar store last year. i just cut off the ring part and glued them on. It took a bit for the glue to dry. 


For food I served Chili. I made it in the crock-pot (recipe to come soon). And it fed all of us perfectly. 
I asked everyone to come to bring a appetizer or dessert. 
My lovely sister in law brought mud cups (chocolate pudding, crushed oreos, and gummy worms) but we ate those later so I forgot to take a picture!), The most delicious chips and dip were brought by some family, and then my other sister in law really had some fun with making Halloween themed snacks, which I remembered to take a picture of right when she got there. 

These are bread stick 'bones' 
She said they are crescent rolls with parmesan and poppyseads. They were delicious and spooky. And went great with our chili!

These are ghosts and witches hats cookies.


I forgot to take pictures of the actual party and of our guests, it got busy with food and stuff and I spaced it, which sucks becuase while the table and food were great, the people are the memories I want to keep... Lame Vanessa, real lame. 
But we had a great time eating food and a disturbing time watching our documentaries. 
I just want to note, I am not trying to glorify the serial killers or what they did, they did horrifying and awful things, and I can't imagine what those victim's families went through. But it is interesting to learn about them and think about how someone's mind can get to that state. After watching several, I have learned that those killers usually had a pretty messed up childhood. And just so you know, you cannot watch too much of those documentaries. I bought the dvd set and it has 20 episodes and I have only watched like 5 this whole month. You have to watch them really slowly because if you watch too many  in a night, you feel like crap and won't sleep that night. But if you watch them slowly they can be interesting and scary! 
But we tried to have a spooky night, and it was fun decorating and eating food and watching only two episodes! 

What did you do for Halloween parties??


Oct 25, 2012

Hanging BOO Letters

My auntie has started a craft day every week with me and some friends of hers in her neighborhood. Somedays we scrapbook, sometimes we do crafts. I have to bring little A-Cakes, who never lets me get much done, but its nice to be able to chat and it gets me in the mood to come home and craft.


They planned this little craft and all I had to do was buy the wood letters. It was pretty easy. 
You need: 

Wood letters
(any kind work fine, I would get medium to large ones, and they can be flat or 3-D. Hobby Lobby was out of all their O's in the wood letters, Seriously, all of them in all the wood styles, it was ridiculous.. So I found these cardboard ones in a different aisle and they worked great.
Paint
Mod-Podge
Cardstock-
Halloween kind
Paintbrush
Ribbon

Its easy enough to figure out what to do. Just paint the wood, I used purple because it seemed fun. Trace the letters on your paper and cut it out, paint mod-podge onto the letters, add the paper and smooth out any bumps. Then once it has dried mod podge over the top of the paper. 
I used ribbons and tulle to hang my letters up, then hung them on my door. I added more ribbon bows on it too.


I love it! Its cute and fun. 
You could also add glitter to yours, or make it scary and add spider webs or fake blood. 


Sep 23, 2012

Oreo Fluff Dip

I love this dessert, it requires no cooking or baking or anything. And it gets rave reviews. 

I found it on pinterest a few months ago and made the recipe from a blog and loved it. I made it the other day again and it was even better this time. 
But for some reason the blog that the recipe is on, is no longer there. I guess the blog owner took down their site or something. So I can't pin back to the original source. 

OREO Fluff Dip

2 packages oreos
2 C. mini marshmallows 
1 small tub whipped cream
1 box oreo instant pudding mix
2 C. Milk

Mix the oreo pudding with the milk, whisk about 2 minutes. 
Crush about 15-20 oreos in the food processor or crunch in a ziploc. Add the oreos to the pudding, add whipped cream and marshmallows, stir until mixed through. 
Let set in the fridge about 30 minutes. Serve, and dunk the remaining Oreos in the dip! 


The blog I got this from says its just a regular fluff dessert, like you eat it with a spoon and stuff, and you can do that but I think its better as a dip, and I love dipping the oreos into it, its like an oreo paradise. I have also tried dipping graham crackers into it and its awesome, Vanilla Wafers would be good I am sure. 
The original recipe also calls for white chocolate pudding instead of oreo pudding, but they didn't have regular white chocolate pudding at Wal-Mart, only sugar free, so we got Oreo this time around and I think it was even better than the first time I made this with white chocolate pudding. 

Sep 20, 2012

DIY Moss Balls


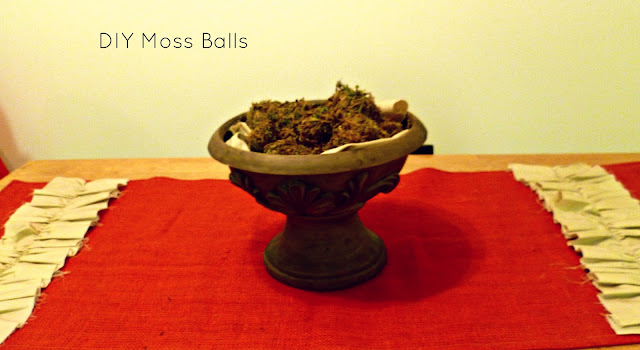
I updated my table centerpiece, it used to be these fake flowers in a vase I got at Target, but after 3 1/2 years of them, I grew tired of the flowers. I found this great standing bowl thing at a garage sale for a buck. It came with some ugly fake fruit, but I just threw those out. I wanted to fill the bowl up with mossy balls, moss balls, balls made of moss, is there like a normal way to say that that doesn't sound dirty?? 
Dollar Tree, Aka: The greatest store on earth, had a package of styrofoam balls, have you bought styrofoam balls at the craft store? They are kinda pricey. So I picked some of those up, and then Dollar Tree also had moss! Seriously that place is like Wal-Mart, it has everything. I used two packages of styrofoam balls and one package of the floral moss. I put the moss in a big heaping pile on a paper plate, then I covered each ball in hot glue and rolled it around in the moss. I did like half of the ball at a time, so I didn't burn my fingers.

The balls were all different sizes so I made big balls and small balls. I loved that they were all different sizes, it made it more fun.

I put them in my little bowl with a piece of tan cloth inside the bowl and put it on my cute table runner and all done. New $ 4.00 centerpiece for a little while. 


Sep 19, 2012

Pita Pizzas

I think this is the easiest meal in the universe. I think its easier than Mac and Cheese (maybe not as easy as E-Z Mac, but that stuff makes me want to vomit) 


Pita Pizzas

1 pita per person eating
1 jar pizza sauce
pepperoni
mozzarella cheese
any other pizza toppings you want (olives, onions, pineapple etc.)

Place pitas on cookie sheet, pile on sauce, cheese and toppings. 

Bake at 400 degrees for about 13-15 min or until cheese is melted. 


Seriously, thats all. Your done. 

Usually when I make homemade pizza I make my own crust, but these are so so great if you are in a hurry or if you are tired or just not in the mood to cook. 


Amazing Fruit and Spinach Smoothie

{YOU DON'T TASTE THE SPINACH, I PROMISE!}


So for the past couple years Jeremy and I have been making these fruit smoothies. We would make them late at night when we were in a snack-y mood but didn't want to eat something heavy. 
Lately I have been trying to eat healthier, and part of eating healthier was cutting out cereal in the morning, but I don't really like yogurt or eggs or most of the healthy breakfast stuff. So I decided to make up one of these smoothies, and I added some spinach and voila! Perfect breakfast shake! 

I am kinda weird and was skeptical of putting spinach in my delicious smoothie, I didn't want to be able to taste it because tasting spinach in the morning sounds disgusting. But you really can't taste it at all (just don't add huge amount of it). And this smoothie makes great baby food. A-Cakes gobbles it up every morning along with Jeremy and I. I mix hers with a little rice cereal to thicken it up so its a little bit cleaner to feed her. 
I do put fruit juice in it. When you are using frozen fruit in a blender, you have to have a liquid to help the blender chop it up a bit. I use 100% Juice only, and even though it is from concentrate, there is no added sugar.


Perfectly Pineapple Smoothies

1 cup frozen fruit- mixture of pineapple, mangos, strawberries and peaches
(Wal-Mart sells a big bag in the freezer section of this fruit mixture)
3/4 cup Dole Orange and Pineapple Juice 
(this is in the freezer section at Wal-Mart and most groceries, it is in the concentrate cans)
1 1/2 handfuls of spinach leaves

Add the frozen fruit in the blender, then add the spinach, then the juice. Blend until no chunks remain. You may have to stop and stir it a few times. Pour in a glass and enjoy! 

You can use this for breakfast or any snack during the day. And the great thing is that you can play around with this recipe, add some more berries, or more spinach. Greek yogurt would totally add some great protein to this, too bad I hate greek yogurt.
{The amount shown in the pics serves two and a baby}


Sep 17, 2012

How to puree your veggies

In my last post, HERE, I talked about how I have started 'hiding' vegetables in my meals. 
And I explained that its not really hiding them since mainly my husband and I eat the meals and both of us know what is in it (A-Cakes sometimes will eat it too) but the vegetables are pureed in in the meal so  you can't really taste it and it helps to get more of your daily veggies in. 

So here is how I started out, using the book Deceptively Delicious as a guide I bought a whole bunch of vegetables at the store, I came home and spent a morning steaming all those vegetables (cut up the veggies in chunks before you steam them). Unfortunately I don't have a steamer, but I do plan on getting one in the near future. But if you don't have a steamer it is fine. All I did is use my rice cooker, you can use pot on the stove too, and just added a small amount of water. I then put the vegetables in the water and covered it with a lid. And left them in there to steam. If  you aren't using a steamer stir the vegetables every so often and make sure the water doesn't evaporate all the way or the veggies will burn. Then once they are steamed you just need to add the vegetable to your blender and blend it until smooth. I then poured it into small sandwich sized ziploc bags, in about 1 1/2 Cup amounts. 
I did this with each vegetable I had bought, then I let them cool in the bags and then put them in a bigger ziploc in the freezer. 
Freezing the vegetables is nice too, because sometimes they go bad before I have a chance to use them, and this way they don't go to waste. I usually make a meal with some kind of meat in it for dinner, so when I take out the meat out of the freezer each morning to thaw I just take out a vegetable baggie too, and it works perfectly. 
If you have a veggie fresh on hand and you are using something that is going to be cooked like spaghetti sauce you don't really need to cook it first. It will cook in the sauce, especially if its a squash because those cook up fast. 

Here are the vegetables I used: 
Zucchini Squash
Carrots
Yellow Squash
Cauliflower
Spinach

You can try fruits like bananas or other veggies like butternut squash and beets, but I have not tried those veggies yet. 

I will be adding more recipes as I go with this new plan, but some ideas in using these veggies that I have used are:
(some of these recipes were posted before I started this meal plan, look for the updates at the bottom of the post for the pureed vegetable I used)


Spaghetti with meat sauce

Chicken Fajitas

Chicken Enchiladas- These enchiladas are fantastic, I have yet to post the recipe on this blog though, but you can find it at Annie Eats. I add a cup of Cauliflower to the sauce. It is perfect. 

Banana Bread- This was one of the few recipes I have used from the Deceptively Delicious cookbook (I mostly use the book as a reference) and it was delicious. It didn't have a ton of sugar which was nice, and it uses half whole wheat flour and half white flour, banana puree and cauliflower puree. I also went a step further and used applesauce instead of oil. 

Applesauce instead of Oil - I don't make my own applesauce, yet. But it is technically a puree. And I love using this instead of oil in my baked goods. I have used it in zucchini bread, banana bread and cupcakes and it turns out great every time. So much healthier for you! Next I am going to try it in brownies. 

Smoothies-  I love Perfectly Pineapple Smoothies that I eat every morning for breakfast. Lots of fruit and spinach. You don't even need to puree the spinach before hand since it is pureed in the blender and doesn't need to be cooked. 

I just started this, but already I am loving the idea, so I will be editing my recipes I have up to add the purees to the recipes and adding new recipes as I create them. 


Sep 16, 2012

Pureeing Vegetables

This past week I made about 15 bags of vegetable purees.


I am now 'hiding' the purees in our dinners and homemade breads and other foods so that the hubs and I can get our full daily serving of vegetables.

I borrowed the book Deceptively Delicious by Jessica Seinfeld from my lovely mother-in-law and followed her plan on adding the pureed veggies to your food, the best thing about it is that you can't tell it is in there. Seriously, for most of the things I have made the past couple weeks I really have not noticed they were in there at all. Some of the things even tasted better with the veggie puree, or so my husband said.

I have a hard time eating a full serving of vegetables a day. I usually eat a decent amount of vegetables too, but seriously you have to eat so many vegetables, and before I started doing this, I was getting about half my daily allotment.
A-Cakes is kinda picky, she won't eat the vegetable baby food no matter how hard I try. It got to the point where she wouldn't even eat the fruit baby food, which she loves, without me forcing it in her mouth to show her it wasn't veggies. So I started mixing the vegetable baby food in with the fruit. And she ate that stuff right up. So that gave me the idea to put veggies in other foods, especially since she eats more 'big people food' now and not only the baby foods. I wanted to make sure that with the 'big people food' she got veggies too. I started with spaghetti sauce. I made my spaghetti and added pureed zucchini to it. I am pretty picky and I didn't notice it at all, and I added a whole zucchini squash to it. Then I remembered the Deceptively Delicious cookbook that my mother in law had. I had never been too interested in the idea with the pureed veggies until now. But I borrowed the book and it has a lot of great ideas.

For a lot of the recipes in the book, I already have recipes I love, such as spaghetti, but I borrowed the book as a reference to see what kinds of veggies she uses in what meals and then I can use my own recipes, but add veggies to them.

Since I started doing this, I have gotten my 3 cups of daily vegetables in each day. And A-Cakes and the hubs eats it all up.

I don't think the point of adding the vegetables to your food is to hide it from your kids, I still believe you should feed your kids other vegetables that aren't hidden and let them know what they are eating is healthy, but I think this is a great way to get all those vegetables in each day and just make your meals healthier and more nutritious. But if you have an older kid more set in their ways, hiding the vegetables might just be your salvation. I still feed A-Cakes other vegetables like tiny pieces of broccoli and peas that are not hidden and as long as its not baby food she does better at eating it.
But as an adult it makes me feel healthy and I know I am getting more out of my meals.

Follow up post:  How to Puree your veggies


Sep 13, 2012

Go Fight Win Cupcakes

I don't like football, in fact when football is on, I see that as my cue to take a Sunday nap. But my husband loves, loves football. He loves him some NFL.  So on the first game day for the NFL we skip church and go to his dad's house and watch a few games. Well I watched A-Cakes and browsed pinterest. To make the day more special I made these adorable football cupcakes. 


Were they hard, well they shouldn't have been. I am sure anyone else out there besides me would think they are easy. But I have serious problems with cupcakes. I really cannot make them work. I also think a big problem with this was that I need pastry bags. I bought pastry tip things to frost with, but silly me, I thought, I can just use a ziploc bag and cut a hole in the tip, well I kept bursting the stupid bag and all my frosting would come pouring out some hole. But the actual making the design was super easy. I just made a box of yellow cake (I only eat yellow and chocolate cakes, white is gross) and then bought some chocolate frosting. I frosted the cupcakes with a light layer of chocolate, and then I put more frosting on top of them with my frosting kit. Then I made some homemade white frosting and put that on top of the chocolate. 
I keep trying to make cupcakes and I am trying to learn to decorate them well, because A-Cake's birthday is in December and I really wanted to make Sesame Street cupcakes for her party. But after my last few experiences making cupcakes I don't think I will be making any Elmo cupcakes. I just cannot make cupcakes well for some reason... 
But anyway these football cupcakes turned out cute, and made a huge mess in my kitchen. 
So anyone else but me could easily make them, I am just doomed with cupcakes.